引入
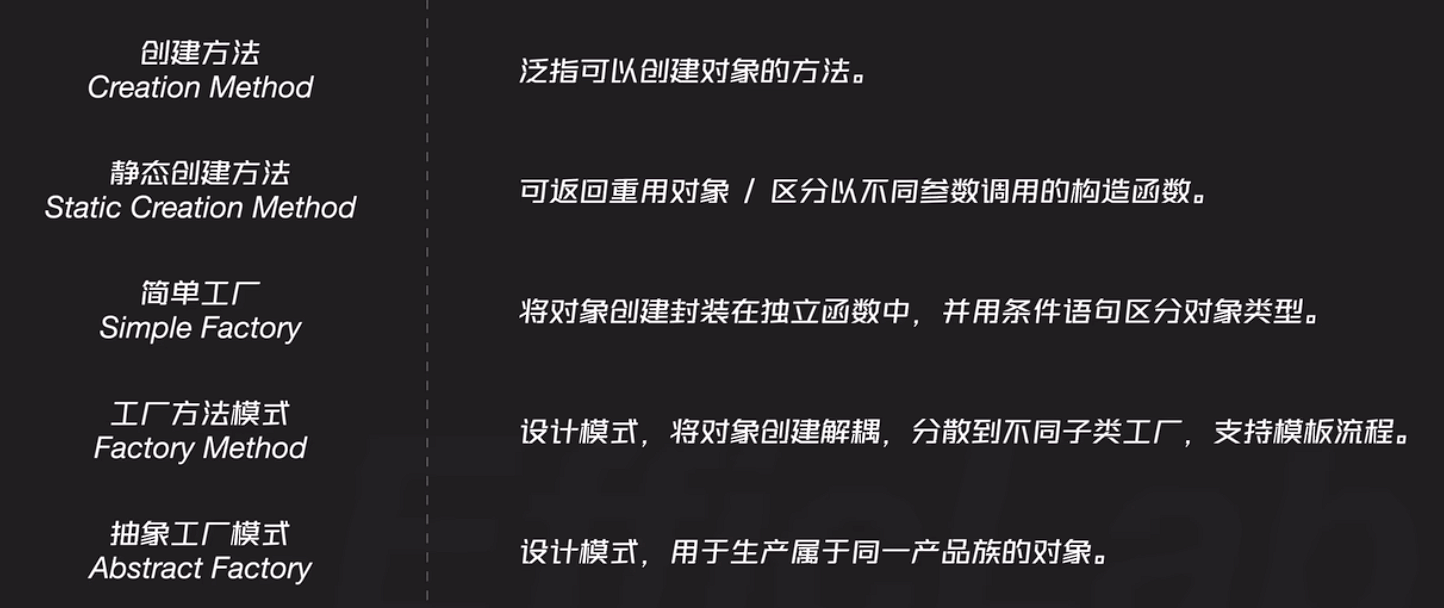
工厂模式本身并不指代任何一种具体的设计模式。其作为一种设计思维指导了几种具体的设计模式:
下面我们从创建方法开始介绍工厂模式的具体内容。
创建方法
创建方法隐藏生成对象的实现细节,让我们可以在代码中使用语意更明确的特定方法来创建对象。
 1
 2
 3
 4
 5
 6
 7
 8
 9
10
11
12
13
14
15
16
17
18
19
20
21
22
23
24
25
26
27
| #include <iostream>
#include <memory>
class Programmer {
public:
void code() {
std::cout << "Coding" << std::endl;
}
};
class Department {
public:
/* 静态创建方法
* 封装了Programmer类对象的创建细节
* 返回可重用对象
* 区分以不同参数调用的构造函数
*/
static auto createProgramer(){
return std::make_shared<Programmer>();
}
};
int main() {
auto programmer = Department::createProgramer();
programmer->code();
return 0;
}
|
在上面这段代码中,Department类封装了创建Programmer类的实现细节。由于我们将createProgrammer设为静态方法,因此这也可以被称为“静态创建方法”。相比于非静态的创建方法,其可以返回可重用的对象并且区分以不同参数调用的构造函数。
简单工厂
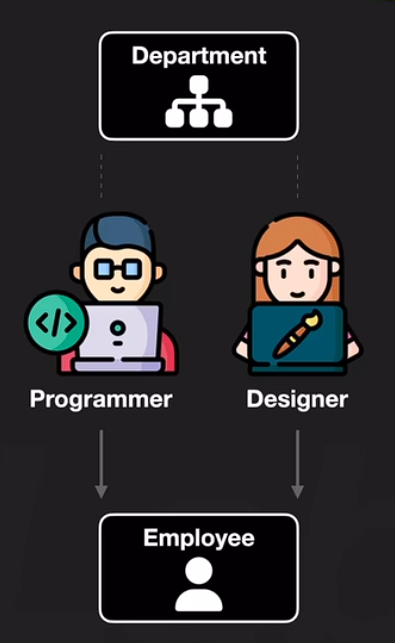
在原有代码的基础上,我们引入新的员工Designer。这时,我们可以在Department中添加条件语句来选择创建不同类型的员工对象;这样的设计模式就是简单工厂模式。
 1
 2
 3
 4
 5
 6
 7
 8
 9
10
11
12
13
14
15
16
17
18
19
20
21
22
23
24
25
26
27
28
29
30
31
32
33
34
35
36
37
38
39
40
41
42
43
44
45
46
47
48
49
50
51
52
53
54
55
56
| #include <iostream>
#include <memory>
#include <stdexcept>
enum class EmployeeType {
Programmer,
Designer,
};
class Employee {
public:
virtual ~Employee() = default;
virtual void work() = 0;
};
class Programmer : public Employee {
public:
void work() override {
std::cout << "Coding" << std::endl;
}
};
class Designer : public Employee {
public:
void work() override {
std::cout << "Drawing" << std::endl;
}
};
class Department {
public:
/* 简单工厂模式
* 通过条件语句判断Type,创建不同的对象
* 违背开闭原则:软件中的对象应该对扩展开放,对修改封闭
* 即应该添加新代码,而不是修改原有代码
*/
std::shared_ptr<Employee> createEmployee(EmployeeType type) {
switch (type) {
case EmployeeType::Programmer:
return std::make_shared<Programmer>();
case EmployeeType::Designer:
return std::make_shared<Designer>();
default:
throw std::invalid_argument("Invalid Employee Type");
}
}
};
int main() {
Department department;
auto programmer = department.createEmployee(EmployeeType::Programmer);
programmer->work();
auto designer = department.createEmployee(EmployeeType::Designer);
designer->work();
auto invalid = department.createEmployee(static_cast<EmployeeType>(2));
return 0;
}
|

对象结构示意
简单工厂模式使用起来十分方便,但是若要继续添加新的员工,就必须修改Department类中的创建代码,这违反了设计模式的“开闭原则”,即对修改封闭,对添加开放。要解决这个问题,我们可以使用工厂方法。
工厂方法
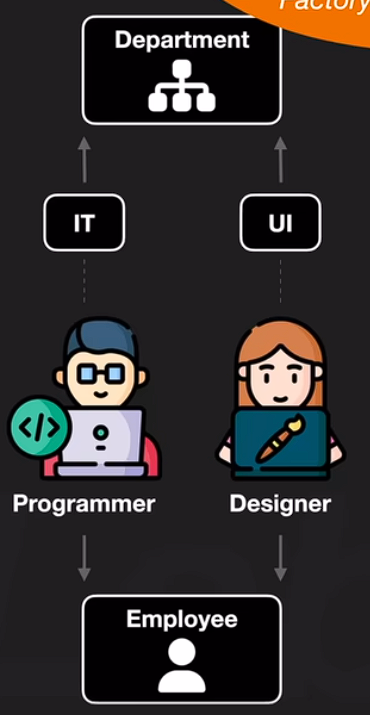
与简单工厂不同,工厂方法将不同类型的产品对象交给不同类型的工厂来创建。这样一来若需添加新的产品就无需修改原有代码。

对象结构示意
使用工厂方法实现还有一个好处,那就是我们可以在工厂的基类中实现模板操作,并且操作中每一个步骤的具体实现都由子类来决定。
 1
 2
 3
 4
 5
 6
 7
 8
 9
10
11
12
13
14
15
16
17
18
19
20
21
22
23
24
25
26
27
28
29
30
31
32
33
34
35
36
37
38
39
40
41
42
43
44
45
46
47
48
49
50
51
52
53
54
55
56
57
58
59
60
61
| #include <iostream>
#include <memory>
class Employee {
public:
virtual ~Employee() = default;
virtual int registerAccount() = 0;
};
class Programmer : public Employee {
public:
int registerAccount() override {
auto id = rand();
std::cout << "Register Programmer Account ID:" << id << std::endl;
return id;
}
};
class Designer : public Employee {
public:
int registerAccount() override {
auto id = rand();
std::cout << "Register Designer Account ID:" << id << std::endl;
return id;
}
};
class Department {
public:
virtual std::shared_ptr<Employee> createEmployee() = 0;
/* 工厂方法模式的核心
* 稳定的模板流程
* 流程中各部分的具体内容由子类定义
*/
int onboard() {
auto employee = createEmployee();
return employee->registerAccount();
}
virtual ~Department() = default;
};
class ITDepartment : public Department {
public:
std::shared_ptr<Employee> createEmployee() final {
return std::make_shared<Programmer>();
}
};
class UIDepartment : public Department {
public:
std::shared_ptr<Employee> createEmployee() final {
return std::make_shared<Designer>();
}
};
int main() {
ITDepartment it_department;
auto id1 = it_department.onboard();
UIDepartment ui_department;
auto id2 = ui_department.onboard();
std::cout << "ID1: " << id1 << " ID2: " << id2;
return 0;
}
|
抽象工厂
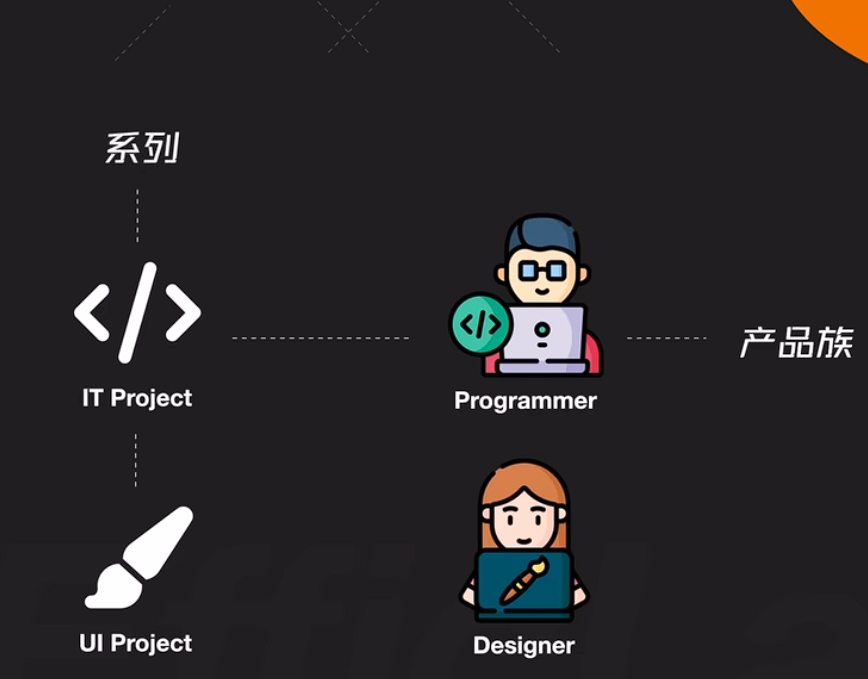
当我们需要创建多个系列的产品时,就需要使用抽象工厂方法。

产品族与产品系列
简单来说,抽象工厂就是在原有工厂方法的基础上再添加一层封装,即“工厂管理”对象。在代码中,我们可以先创建不同系列的工厂类,再将其传给工厂管理对象,最终创建出符合要求的对象。
  1
  2
  3
  4
  5
  6
  7
  8
  9
 10
 11
 12
 13
 14
 15
 16
 17
 18
 19
 20
 21
 22
 23
 24
 25
 26
 27
 28
 29
 30
 31
 32
 33
 34
 35
 36
 37
 38
 39
 40
 41
 42
 43
 44
 45
 46
 47
 48
 49
 50
 51
 52
 53
 54
 55
 56
 57
 58
 59
 60
 61
 62
 63
 64
 65
 66
 67
 68
 69
 70
 71
 72
 73
 74
 75
 76
 77
 78
 79
 80
 81
 82
 83
 84
 85
 86
 87
 88
 89
 90
 91
 92
 93
 94
 95
 96
 97
 98
 99
100
101
| #include <iostream>
#include <memory>
#include <unordered_map>
#include <vector>
class Employee {
public:
virtual ~Employee() = default;
virtual int registerAccount() = 0;
};
class Programmer : public Employee {
public:
int registerAccount() override {
const auto id = rand();
std::cout << "Register Programmer Account ID:" << id << std::endl;
return id;
}
};
class Designer : public Employee {
public:
int registerAccount() override {
const auto id = rand();
std::cout << "Register Designer Account ID:" << id << std::endl;
return id;
}
};
class Project {
public:
virtual ~Project() = default;
virtual void assignTo(int) = 0;
};
class ITProject : public Project {
public:
void assignTo(int id) override {
std::cout << "Assign an ITProject to Programmer ID:" << id << std::endl;
}
};
class UIProject : public Project {
public:
void assignTo(int id) override {
std::cout << "Assign an UIProject to Designer ID:" << id << std::endl;
}
};
class Department {
public:
virtual std::shared_ptr<Employee> createEmployee() = 0;
virtual std::shared_ptr<Project> createProject() = 0;
virtual ~Department() = default;
};
class ITDepartment : public Department {
public:
std::shared_ptr<Employee> createEmployee() final {
return std::make_shared<Programmer>();
}
std::shared_ptr<Project> createProject() final {
return std::make_shared<ITProject>();
}
};
class UIDepartment : public Department {
public:
std::shared_ptr<Employee> createEmployee() final {
return std::make_shared<Designer>();
}
std::shared_ptr<Project> createProject() final {
return std::make_shared<UIProject>();
}
};
class DepartmentManager {
Department & department;
public:
std::vector<std::shared_ptr<Project>> projects;
std::unordered_map<int, std::shared_ptr<Employee>> employees;
explicit DepartmentManager(Department & department) : department(department) {}
auto createProject() {
auto project = department.createProject();
projects.push_back(project);
return project;
}
auto createEmployee() {
const auto employee = department.createEmployee();
const auto id = employee->registerAccount();
employees[id] = employee;
return id;
}
};
int main() {
ITDepartment it_department;
DepartmentManager it_manager(it_department);
const auto project = it_manager.createProject();
const auto id = it_manager.createEmployee();
project->assignTo(id);
return 0;
}
|
在上面的代码中,不同类型的工厂用来创建不同类型的产品族;原先的模板方法也可以继续在工厂管理对象中得到实现。
总结


